Home made hive boxes are super easy if you have a table saw and a template. I do a simpler joint but I've been using mine for 6 years and they still keep kickin. Normally these boxes go for $15, but you can make your's for under $4 or sometimes free. Here's how.
If you buy a super from the bee supply you've got all you need to build a hive. Above are the two template pieces (from the bee supply store's boxes) next to all the freshly cut hive body parts.
Keep in mind that keeping everything exact is very important to stacking your boxes as well as for the frames you put in. If boxes are made incorrectly frames will fall through or not fit and bees will build more comb in the wrong places. It's probably a good idea to buy 2 store bought boxes and put one together to check all your copies. Stack them on top of that one to make sure all the sides line up.
I know there are all sorts of sized boxes. However I've been doing all medium's and so have many other beekeepers. It's great!! All my parts are interchangeable. So all the below is mediums, but I don't see why you couldn't do the same thing for any other size.
Use the box template to set your saw width. You don't even have to use a tape measure : )
Cut your wood to size. Any solid wood will do. Plywood and particle board falls apart! Don't use! Not sure if the wood you found is the right size? Just put it up next to your template piece and check for goodness sake! That's what you got it for, so bring it along or at least measure it.
For the long side you will go the full length of the wood including the joint.
Get the one end flush with the end of your board, then draw your cutting lines here.
For the shorter sides you will not be using the box joints.
Get the interior cut flush with the end of the board and mark it to cut here.
Once you get a couple good pieces cut and you compare them to your templates. Go ahead and use them to draw your lines. Check your pieces every so often by lining everything up that you cut and feel with your fingers to see if it's the same as the other pieces. If you are cutting multiple pieces do one at a time or one from each end, then draw the next line. That way you get the exact sized piece without the saw taking a little off. This one above is marked to cut from each end.
The long pieces should be 19 7/8 and the short pieces are 14 3/4 inches.
Use the table saw to cut grooves in the short pieces. This is where your frames will rest. I typically use the store bought piece and place it in the saw. I then raise or lower the blade to just thr right place. There are two cuts. You will cut one verticly as shown in the picture (probably wan't to do that first) then one horizontally
So you put the short ends on something. Make sure you have the grooves the right way!!
Put on some tight bond 2 glue or other wood glue.
Line up the long board like so and tack it on. If you don't have a finish nailer, just put your screws in now. (sorry for the bad piece of wood in this shot) Of all the pieces I pick to photo! It was just a little tick off the end and won't make a big difference.
The long pieces have the exposed grain. Just paint that part good and it will be fine.
OK Flip it over and do the same for the other side. Do one then the next. You may have to push those pieces to line them up good.
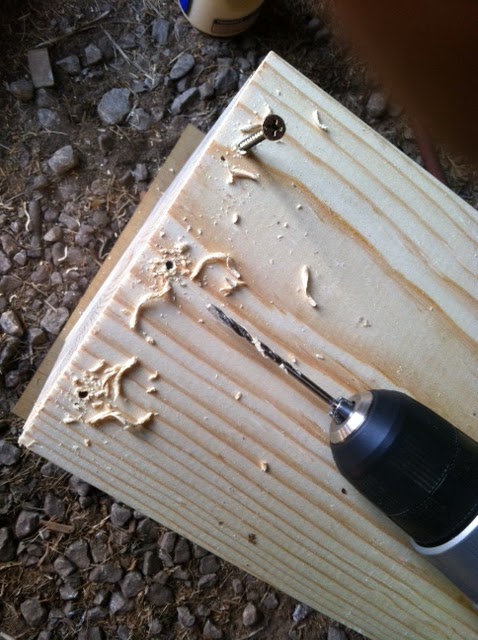
I drill pilot holes and screw afterwards. But like I said, if you don't have the nailer, just do it while you glue it. Let me also mention that you should screw them together while the glue is wet.
Better check the first one. Yep, just the right fit.
In this pile I tacked 5 then went and screwed them while the glue was still wet. I would like to pint out how they stack so nicely. You want them to stack and line up.
I then paint. Don't paint the inside!!! Bees keep things clean and dry in there. And then add a piece of lumber for the handle. You may want to paint that, but I skipped it. I'll just put another one on when it goes bad (it hasn't yet)
How about frames? I buy them. But I do not buy foundation. That's a buck a sheet!
Buy some of those jumbo popsicle sticks from the craft store and put those in there. Bees will build from the lowest point. Although It might help to have a sheet or two of wax in there to start. I would only suggest 2 or so frames in your first box. Once the first box is drawn, just pull a frame from there and put it up in your next super.That way they have something to climb. They like to start at the top so, it helps.
Glue em in there. In fact don't bother nailing your frames. Wood glue is as strong as nails. Be generous!
Newspaper to catch the drips. I don't nail my frames. It's all glue and they work just fine.
So I guess I didn't show how to build your own frames from scratch. By the way I'd order grooved top bar grooved bottom bar. However, You saved over $10 on the box, and $10 per box on foundation. That's an extra $100 bucks on a five medium hive!


No comments:
Post a Comment